How do I add images to my templates?


* originally posted on the old ewcouture.com blog, on October 22, 2012
How do I add images to my templates? (screenshots tutorial)
The easiest way to add an image to your templates is to use a clipping mask.
All EWCC templates already come with the clipping masks you see in the preview images of the products. Using the masks will help you keep the integrity of the designs.
Here are the steps you can follow, if you are using Photoshop CS and up. If you have further questions, don't hesitate to contact me.
Photoshop Elements user?
The artwork in most of the templates is grouped in folders to keep the files tidy, organized and easier to work with. However Photoshop Elements doesn't like grouped layers.
To be able to work with the files in PSE, you would need to ungroup the layers first. Here is a free action to help you do that.
1. Open - with Photoshop - the template file you want to add your images to.
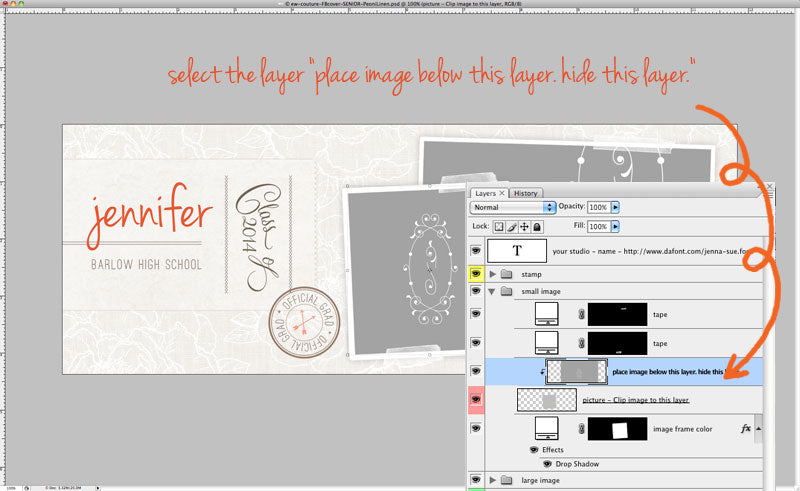
2. In the template select the layer "place image below this layer. hide this layer."
3. Open - with Photoshop - the image file you want to place in the template.
4. Use the move tool to drag the image into the template file.
* There are a number of other ways to copy your image in the template. I will present a couple at the end of the tutorial. Check them out, if dragging the image doesn't make sense or work for you.
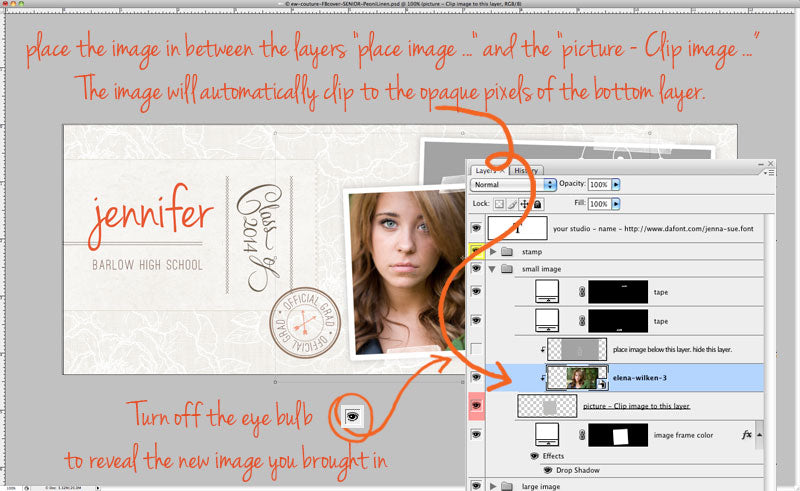
5. With the Move Tool selected (use keyboard shortcut V), drag the new layer that formed with your image, and place it in between the layers "place image below this layer. hide this layer." and the "picture - Clip image to this layer" The image will automatically clip to the opaque pixels of the bottom layer.

6. Turn off the "place image below this layer. hide this layer." layer, to reveal the new image you brought in.
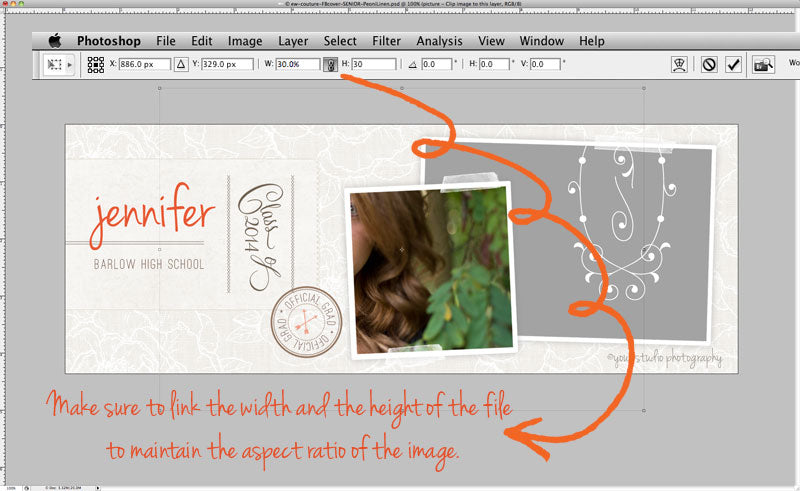
To resize your image go to Edit > Free Transform > Scale. Hold the Shift key down to keep the proportions of your image correct, while resizing it.
Shortcut for resizing - Use keyboard shortcut Cmd+T on a Mac or Ctrl+T on a PC. Make sure to link to width and the height of the file to maintain the aspect ratio of the image. Experiment with different percentages while resizing the image. Once you are happy with the size of the placed image double click your mouse or hit enter to commit to the new size.
8. Using the move tool, you can still move the image layer around to place it exactly where you want it to be.
Frequent problem :: The clipping mask already included will release and "break" if you accidentally copied or brought in the image file in between the "place image below this layer. hide this layer." and the "picture - Clip image to this layer" layers.
How to fix it :: To restore the clipping mask simply place your cursor in between the image layer and the "picture - Clip image to this layer" and hit the "option" key on your keyboard ("alt" on PC). Your mouse arrow will transform into a double-circle arrow. Click it once to restore the clipping mask, while you are still hovering in between the two layers.

>>>>> EXTRA (* step4) - Other different ways to copy your image in the template. <<<<<
PLACE
• Choose File > Place in the main Photoshop menu bar to place the image file in the template file.
The beauty about the PLACE method is that the image will be placed withing the bounds of the template file, at a size no larger than the template file. The transforming and resizing of the file will be less involved and complicated.
• While in the image file, in the main Photoshop menu bar choose Select > All. Marching ants will appear all around the image.
• Choose Edit > Copy in the main Photoshop menu bar to copy the image (or simply use the shortcut Cmd+C on a Mac or Ctrl+C on a PC)
• In the template file, go to Edit > Paste to paste the image on a new layer (shortcut Cmd+V on a Mac or Ctrl+V on a PC)
Leave a comment